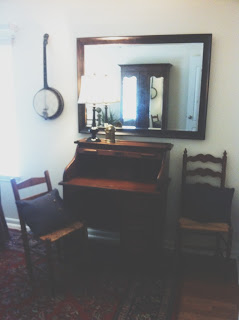
The Slater family recently left a huge home in the country of 17 years to downsize to a more manageable home in old town Katy. Sometimes coming into a new place with a bunch of old things can seem overwhelming but a little thinking outside the box can transfer standard boxed room into something truly unique.
So here's the break down of what i did with things they already owned in their house. All they would need to buy now is bedding. thats a total win.
- I added an 8x10 old rug to bring color to the room it fit like a glove. This concept has become my new obsession and i might have to add this element to every home i set my hands to decorate. Rethinking the placement of this rugs is also a great way to repurpose an old rug.
- Old rugs can be overwhelming in color or dated in design, so my tip is flipping over the rug so you get a muted version of it that can be less daunting in your makeover adventure.
 |
| You can see here the difference in the sides of the carpets. |
- After laying carpet down i set up antique twin beds they had in storage. Instead of using a head board and foot board I used the two end pieces to create a daybed. I secretly want to shove this amazing bed in my purse and take in home with me. I love it!
- i took them apart and added white shutters (that the Slaters had bought at a thrift store) to the walls instead of using them as blinds I repurposed them as art to set off the bed bringing dimension to the room.
- I took a table they were using as a tv stand in another room to add as a night stand. The height of table is perfect because its high enough to be able to reach over bed post bars.
- I grabbed this beautiful desk they had in the master hiding under a tv, its so perfect in this little room of adventure. It makes me want to go old school and write a handwritten love letter to someone. Old sap right here.
- One of my favorite things is to add as many personal items in a rooms as possible. You want to make your home feel like a. someone lives there and b. you're that someone. I hate going into home where it looks like someone walked in a room and bought the whole set...gag. Sorry if thats you but seriously its so boring. I asked the Slaters if they had any instruments in their house that i had not seen, (most people have instruments are in their cases collecting dust, so its just not you, you're in luck there are others) and they did. i love bringing them into the design because it adds funk and hopefully inspires the owner to pick up and get their groove on. So insert their banjo... which has to be one of the coolest looking and playing instruments out there. I swoon for banjos.
- I then grabbed the armoire that was in the other room with a queen bed and brought it into the room. It fit better in this space because of the smaller bed and because of the size and it's function, it grounds the look. I personally think are like an oversize travelers trunk.
- Found this boat baskets in storage, we were going to use for bread, and decided they'd be better on the wall. Carbs will kill you. :)
- The more interesting non-matching lamps the better. Using lamps instead of over head lights literally will change the feel of the room. It will bring a glow to one's face rather than beating down on one's head.
- Lastly I grabbed a live plant to tie up the room. I'm a totally advocate for adding live plants to rooms to reminds us that we are among the living not the dead. It also brings color and freshness to a dull or an older home.
In 4 hours beautiful transformation can happen, just have an open heart and mind and who knows what you will create.
Happy travels even if its to the other room.
kjoy


